在本文中,我们将学习如何在Angular元素中投影内容。如果您不熟悉以下内容,
- 影子Dom
- 视图封装
- 内容投影
我建议你在前进之前阅读下面的文章:
到目前为止,您知道我们使用了ng-content来执行内容投影,如下面的清单所示:
从 “@ angular/core” 导入 { Component};@ Component({'app-greet' 选择器,模板: “”<h2 >{{ title }}</h2><ng-内容></ng-内容>' })导出GreetComponent类 {title = 'Greet';}
您还可以对内容进行投影,如下所示:
< h1 >欢迎来到 {title }}</ h1 >< app-greet >< h3 > Hello Foo </ h3 ></ app-greet >
上述方法的挑战是, 如果你使用GreetComponent作为你的Angular元素, 你将无法投影内容。为了更好地理解这一点,让我们从将GreetComponent转换为Angular元素开始。在这里你可以学习一步一步的tp创建角度元素
将GreetComponent转换为Angular元素后,AppModule应如下所示:
从 “./app.com组件” 导入 { AppComponent};从 “./greet.com组件” 导入 { GreetComponent}; @ NgModule({声明: [AppComponent, GreetComponent],进口: [浏览器模块],供应商: [],引导: [GreetComponent],entryComponents: [GreetComponent]})AppModule导出类 { 构造函数 (private injector: Injector) {const customElement = createCustomElement(GreetComponent, { injector });customElements.de fine( 'app-root', customElement);} ngDoBootstrap() { }}
现在,您可以在index.html上使用GreetComponent,如下面的清单所示:
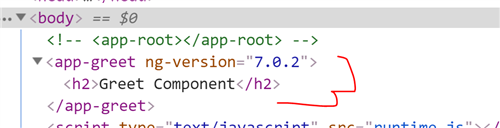
< body ><!-- <app-root></app-root> -->< app-greet >< h2 > 嘿Foo </ h2 ></ app-greet ></车身>
在运行应用程序时,您会发现 <h2> 元素尚未投影到Angular元素GreetComponent。
从Angular 7开始,我们还有其他选择来做内容投影插槽。要在Angular元素中进行内容投影,您必须执行以下操作:
- 将ViewEnacpsulation设置为ShadowDom
- 使用插槽而不是 <ng-content>
让我们修改GreetComponent,如下面的清单所示:
从 '@ angular/core' 导入 { Component,ViewEncapsulation};@ Component({'app-greet' 选择器,模板: “”<h2 >{{ title }}</h2><slot name = 'message'></slot>',封装: ViewEncapsulation.ShadowDom})导出GreetComponent类 {title = “ 问候组件 ”;}
我们已经将封装设置为ShadowDom,并将 <ng-content> 替换为 <slot>
Angular从一开始就支持Shadow Dom。在Angular 6.0之前,有三种封装模式
- 已仿真
- 原生
- 无
模拟是默认模式,本机模式用于创建影子Dom v.0。从Angular 6.1开始,Angular开始支持Shadow Dom v.1。您可以使用第四个选项ShadowDom在组件上启用Shadow Dom V.1。如果将封装设置为ShadowDom,则Angular会创建Shadow Dom v.1。要在Angular元素中进行内容投影,您需要将封装设置为ShadowDom。
现在在运行应用程序,你会发现内容已被投影,如下图所示:
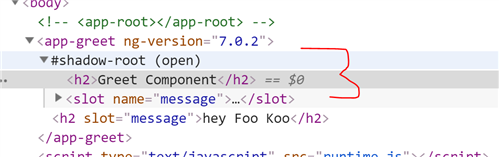
因此,通过使用ShadowDom封装模式和插槽,您可以在Angular 7.0中的Angular元素中投影内容。我希望你觉得这篇文章有用。谢谢你的阅读。如果你喜欢这篇文章,请分享。另外,如果您还没有签出为Angular组件点燃UI,一定要这样做!他们有50个基于材质的Angular组件,可帮助您更快地编写web应用程序代码。</p